Wednesday, February 6, 2013

Drivers Side Door finished?

From my last blog you noticed I had a problem with the door alignment at the rear quarter panel and the door opening.  I figured out why, the rear quarter panel was replaced before I bought the car.  Well the bozo's that did the work didn't care.  And by looking at the alignment holes around the edge of the convertible top the holes do not align up.

The holes toward the top are suppose to align up.

You can see the hole is off toward the back by about a 1/4 of an inch.

So I can either remove the rear quarter panel or find another solution.  The other solution is to add metal to the door.

I believe Alex and others did a similar process on their doors also.  I got a 1/8 inch metal rod and started to weld the rod to the door edge.  After buying new doors, the last thing I wanted to do was to weld on them.  What if it makes it worse? Or the panel warps?  Well, I have to move forward.

I would tack weld the rod and cool it off with water to keep it from warping.

Checking the alignment.  The top of the door has a bigger gap than toward the bottom of the door.

Guess I'm going to be adding another rod toward the top.

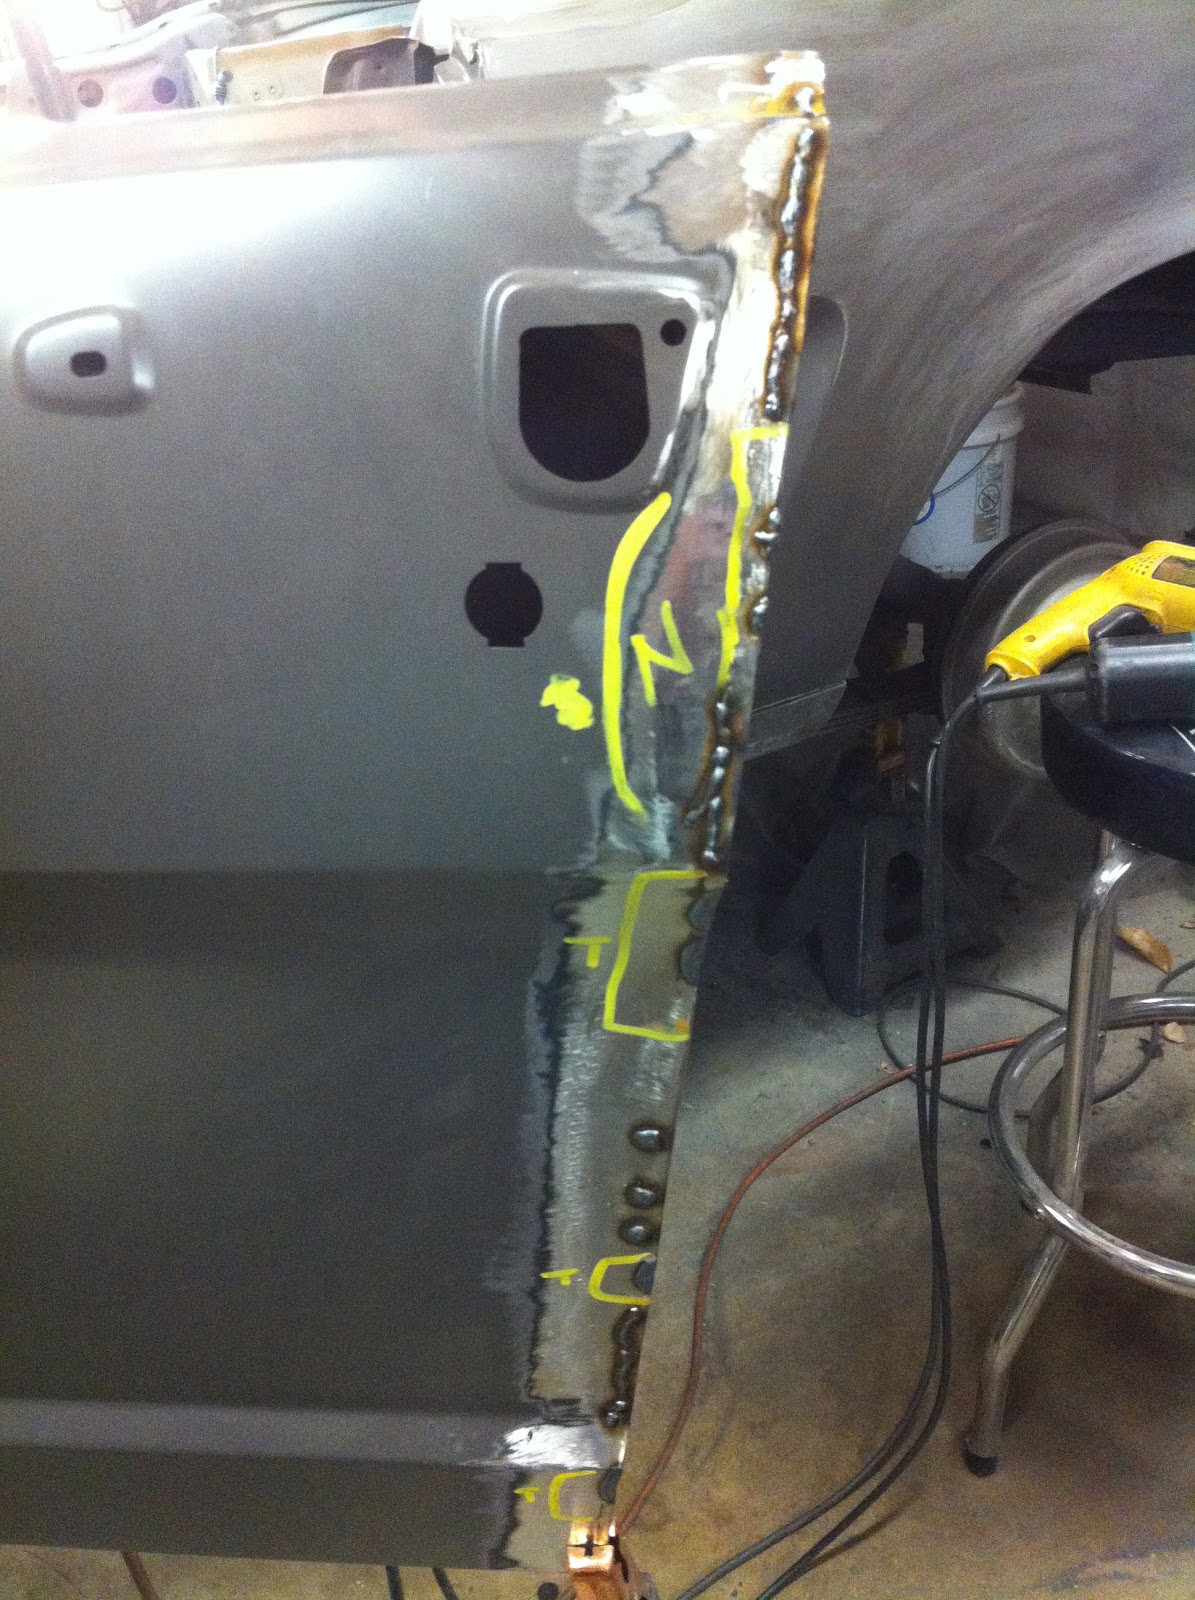
Making marks with a paint pen to help me.

Starting to look better.

Progress.

Looks like it might work.  Trimming, cleaning, welding, grinding, hours and hours of working the metal.

Had to add a bit of metal to the inside or else it would catch your shirt or jacket when you close the door.

Painted it the base coat to check for errors.  Need to clean up the edge a bit but this is almost finished.

The inside edge.  I hope this works out and doesn't look funny.

Wednesday, January 9, 2013

Door Latch and Lucky Striker post

I know the door will need some more alignment, so first I wanted to install the door latch and lock mechanism to make sure the door locks first.  I cleaned up the latch and installed it in the new door.

I should have taken a pic of the before.  It was painted over with a few coats of Turquoise.  I found a pic of the door from before (below) and you can see part of the latch below the data plate.  I originally took this pic for the location of the data plate since I am removing it and putting it on the new door.  They sell the rivets online.


I used WD-40 and let the part soak for a while.  The tough layers I used a little citrus foaming paint remover and a q-tip.  As soon as the paint started to soften, I scraped it off with a screwdriver.  I didn't want to use my media blaster because it would have taken the gold cadmium plating off.


You can see one hole for the data plate to the upper left of the latch.  I will have to drill the other before I paint the door.
I ordered the screws for the latch from AMK and installed them.

I also installed the Striker latch with new screws from AMK.

Once I got the fenders on and the doors, I made sure the door latched correctly and rigged up the handle so I can open the door.  Door works fine. Now I have to deal with the "Gap!"

Tuesday, January 8, 2013

Drivers Door Remote Mirror

I am working on the door alignment and fit of the new doors and needed to get moving so to get started I went ahead and drilled a hole in the door just for fun!  Actually it's for the remote controlled mirror for the drivers side.  The door came pre-drilled for the standard mirror but since mine has the Pony package, it has the remote mirror.  I measured the old door, checked on the Mustang forums, and doubled verified the right distance and location on the door and started the process.


Checking the location.


Drilled the hole for the cables.
You can see the two holes in front for the standard mirror mount.  I will fill those in shortly.


Lower mirror bracket


Lower Mirror bracket mounted.


Mirror is mounted.


Grind down to the metal to fill in the old holes.


Welding the holes.


Add a little body filler.


Sand it with my round block.


Ready for primer.


Fender Action

Many moons ago...

 Happy New Years!  I know I have not posted an update in a few months, so I will do my best to get up to speed.  I started a new job and got the commute synced so I can get home and still have time for family and the Mustang.

I was working on the passenger fender in a previous blog and I tried to save it since it was the original fender that came with the car.  But the fender had so much body filler, the lower fender had a panel welded on top of the rusted lower back portion and then more damage and rust.  I thought I could make it work.  Replaced the lower section, bumped out the dents, worked the metal and when I thought I had it, it didn't fit.  Way off on the alignment.  So I did what I had to and bought a replacement Ford fender.  Cost more than the aftermarket fenders but I'm trying to go original as much as possible.

 Painted it the brown base coat that I found on the original fender.

Test fit and all looks good.