Sunday, September 12, 2010

Body work,and more a fixin's

It's been months since I wrote anything on my blog but it doesn't mean I haven't been working on the Stang.  Actually I got a new job and I have been very busy during the day.   But at night I work on the Stang a couple of hours every night.  One of my biggest problem has always been my welder.  It was a nice wire-feed flux core which worked great on thick metal.  But the thin stuff is no match for it and I really needed a Mig welder.  Eastwood had recently came out with a group of welders just for folks like me.  So I got the MIG 135.  Side note.  Argon gas canisters are about $200 for just the cylinder and then you get to trade in the old one for a new one.  I opted for the smaller tank but I should have gotten the larger one because I go through a tank about once a week.  This welder is one huge improvement and I can work on the thin stuff without burning holes.


Again with the quarter panels.  The inside panel and out side panel was not matched up properly and there was a lot of body filler in this area.  I had to pull the dent out with a dent puller, weld it up, clean it up and smooth it out.

I got to use my new welder!  Yeah!

Much better.

Inside the trunk.  This shelf was a real mess.  I replaced the trunk support and didn't replace the shelf.   It didn't look right so I cut it out and replaced it.


Patch panel.  There is the old flux core welder on the floor.  

Welding patch in place.  I'm still cleaning up this part.  Pics to come on next blog.

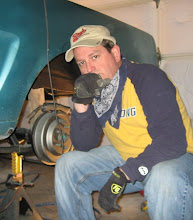
More to working on the Passenger side.  You can see the small Argon tank I got.  The guys at the tractor supply place where I get my exchange said I can upgrade to the larger tank.

A while back I took the trunk lid off and decided to detail the hardware.


In the media blaster tank.  


Here it is cleaned up and packed away.

Sorry for the delay in sending an update.  More to come.

Friday, May 28, 2010

Dropping the Top Part III

I still had one more step on this top frame blog.  I really needed to get the convertible top frame out of the car since I reassembled it on the car so when I paint the whole car, I don't have any errors.

My friend Justin came over to work on his car and give me a hand with mine.  He took these pics.

Thanks to Justin for helping get the frame out of the car, prep for final paint, and helping me store it in my basement.  Thanks Bro!  Sorry we couldn't fix that O2 sensor.

Sunday, May 23, 2010

Dropping the Top! part II

This is the stage where I am cleaning up the convertible top frame for paint.


Bow #1.  Cleaning it up with a wire wheel on a drill.  First I have to remove the tack strip.  It is riveted in place.  Cut the rivets with the Dremel tool.


Bow #2.  Not bad. You can see the felt.


Inside the media blaster.  I took the inlet ballast off to allow for the extra size of the part to blast.


Parts from Bow #2 side mount.  I'll blast these also.

Bow #3 was a pain.  These screws would not budge.  I will have to cut them out, drill, and tap.


The inside damage from rust.  The thick felt I mentioned before rested in this area.  Thus, moisture took it's toll.  I'm sure it is not as bad as some.  But this part was never re-manufactured.  So you have to either make a new one or use what you got.


Drill out the screws.  Start with the smallest drill bit first the move up in size.  Run the drill slow.  Fast speed will just kill the drill bit at this point.  It cuts much better at slow speeds and with oil as a cutting agent.  I use WD40. Not the best for cutting, but it's all I had at the time.  When the bit stops cutting, you ruined it.  You have to go easy on the small bits.


After drilling, I cut in from the side with a Dremel cutoff wheel and then a wedge punch to get under the edge.  Pop it!


Tap all the screw holes.  Then blast it and paint it.


Blasted.  Paint next.


Bow #4


Cleaned it up with a wire wheel.


Putting the frame back together.


Bows 2, 3, and 4 installed.


Bow 1 installed.


Rivet a new tack strip onto bow #1.


Done. Need to tweak a few bolts and I will remove the frame and store it and get the body work finished for paint.

Saturday, May 22, 2010

Dropping the Top! Part I

Dropping the Top!  Literally!


I will remove the cloth top, the frame, the power top hydraulics, paint the frame.  Reassemble and then remove the whole frame as one.  Store it away in the basement and continue to prep the car for painting.  I had already removed the back part of the top (back glass/clear vinyl) when I worked in the  top well.  In my last blog I talked about how I should have removed the top before working in the top well.  These are the stages I took to remove the top and frame.


First I removed the weather stripping and then started to work on bow # 1.  There is 4 bows total.  The front, two in the middle and one on the back.  Bows 1 and 4 have tack strips.  Bow 1 is made up of alloy and the rest are steel.  
Bows 2 and 3 look just alike except they fit differently and they are marked on the inside JIC.  They also had a felt padding inside the ends of the top of the bows.  I guess to keep lines from showing up in the curve of the sides in the top.  This area showed a lot of rust issues because the felt was so thick, it held moisture for a long time.  You will see this in part II.

These next few pics are the break down in stages.  It helped a lot to still have the power top working.

Bow #4 tack trim being removed.

The locking truss and handle.  The driver side handle was broken and I replaced it years ago with this aftermarket handle.  Notice the shinny bolt and no ford part number.  And the spring is missing.  I will make this part look much better when finished.  It is a lot easier to work in the area without the top on. 


Just about finished with removing the cloth.  It has a lot of staples to remove.  Pulling and prying and it will come off.  Like I mentioned before, keep the old top for a template for the new top.

Next is breaking down the frame.  Media blasting it, paint and reassemble.

Tuesday, April 20, 2010

Lassie! Where's Timmy? Stuck in the Top Well again?

While I am repairing panels and detailing parts, I began working in the convertible top well area.  I cleaned up and removed the old seam sealer and prep the area for primer.


I cleaned it up with a wire wheel brush on a drill.  One small section had some surface rust.  Painted that area with POR15.


Primer


Let it dry.


Apply a little seam sealer on the edge of the panels.  I found some black cloth tape in this area on the edge of the panels when I was cleaning it up with a wire-wheel.  I'll research this tape more.  I know it was used to hold down wiring and I found it used to block off a large oval hole by the top frame and rear quarter window.


A little on the teeth :-)


Let it set up.


A little paint.  

Take the rag top off next. I should have done it before this clean up. I'll post that next.

Sunday, March 28, 2010

More Quarter panel and trunk pics

As I mentioned before, the previous work done by a body shop somewhere did a crappy job in hanging the rear quarters as can be seen here where the trunk lid and rear quarter tips don't match up.

Of course I am going to repaint the car. I have painted a few cars before and I also have better equipment.  I have no choice at this point.  I thought about just touching up the paint job and matching the paint color but after many attempts I found they never used the original color to paint the car.  They got it close, and I got close to matching that color, but it is still not the original color.  So I am just going to finish it up on the correct side as close to stock as possible.  Fixing the area of the trunk has been a huge task and still more to come.

Enjoy!  More to come soon!


Not much can be done to fix it other than cut the welds and align the panel.  I only cut the rear welds so I could match it up.  When you need to replace panels, dry fit everything around that area first before welding then tack weld and look again and again...


Additional pics uploaded 033010.  Here is the butchery of hacking away at a poorly hung rear quarter panel.  I had to cut away at the welds from the previous work.  I cut a V into the lip area and inside the trunk I cut away at part of the panel it attaches to.  


A lot of ugly work being done. Cutting and metal bumping.


Still hacking and drilling and bumping!


Close to being finished!


This is how I goo on the sealer.

Cheap soft bristle toothbrush (4 @ $2) gives me a better grip than the acid brush.  

Seam sealer Fast n' Firm ($20).  Save all you can from this tube.  I seal it back up when finished which is why I don't use it in a caulking gun.  If you can get it close to a lamp or heater, it spreads much better when warm.


A little dab will do ya!


Give it that nice brush stroke texture.


And the passenger side is sealed!


Fixed it after many hours of working the metal.

I just loose fit the end caps for a sight check.  There is a rubber seal that need to go under the caps during assembly.


Looks much better!  Tweak the trunk lid a bit and it will be fine.


Drivers side


Now I need to fix that warble in the middle of the rear panel next to the gas cap.

More to come!  I am using my good camera now and not the iPhone to take pics.